
Getting your first tattoo brings excitement mixed with anxiety about pain. Many first-timers overestimate discomfort and misunderstand how numbing solutions actually work in Europe. This guide cuts through confusion with evidence-based preparation steps, realistic pain expectations, and safe numbing cream practices approved across European markets. You’ll learn proven non-numbing preparation methods, understand which body areas hurt most, and discover when pharmacy-grade numbing creams make sense for your situation. Whether you choose natural pain management or pharmaceutical support, proper preparation ensures a smoother, more comfortable tattoo experience.
Table of Contents
- Key takeaways
- Understanding standard tattoo preparation for first-timers
- Managing pain during tattooing: what to expect and practical tips
- Numbing creams and European regulations: what you need to know
- Practical checklist and final tips for pain-conscious tattoo preparation
- Explore trusted numbing creams for a more comfortable tattoo experience
- FAQ
Key Takeaways
| Point | Details |
|---|---|
| Skin prep essentials | Proper preparation includes hydrating the skin, avoiding sun exposure, eating well, and getting adequate rest in the days before your session. |
| Pain by area | Pain intensity varies by body area, with bony spots like ribs, ankles, and wrists typically more painful than fleshy areas. |
| Breathing and breaks | Practicing slow breathing and taking short breaks every thirty to forty five minutes can reduce perceived pain and anxiety. |
| Cream patch tests | Pharmacy grade numbing creams require a patch test and artist consent. |
Understanding standard tattoo preparation for first-timers
Proper preparation starts well before you sit in the tattoo chair. Your skin condition directly impacts how well it accepts ink and how comfortable the process feels.
Standard tattoo preparation includes hydrating skin, avoiding sun exposure, skipping alcohol and blood thinners, eating nutritious meals, and getting adequate rest. These steps create optimal conditions for both the tattooing process and subsequent healing.
Hydration transforms skin texture and elasticity. Drink plenty of water daily for at least seven days before your appointment. Well-hydrated skin accepts ink more smoothly and experiences less irritation during the process. Dry, flaky skin makes the artist’s job harder and increases your discomfort.
Sun exposure damages skin in ways that complicate tattooing. Sunburned or tanned skin peels, changes texture, and may reject ink unevenly. Protect your tattoo area from direct sunlight for at least two weeks before your session. If you’ve recently burned the area, reschedule your appointment.
Alcohol and blood thinners create bleeding problems during tattooing. Skip alcoholic drinks for 24-48 hours before your appointment. Avoid aspirin, ibuprofen, and similar medications unless medically necessary. Excessive bleeding dilutes ink, extends session time, and makes the experience messier and more uncomfortable.
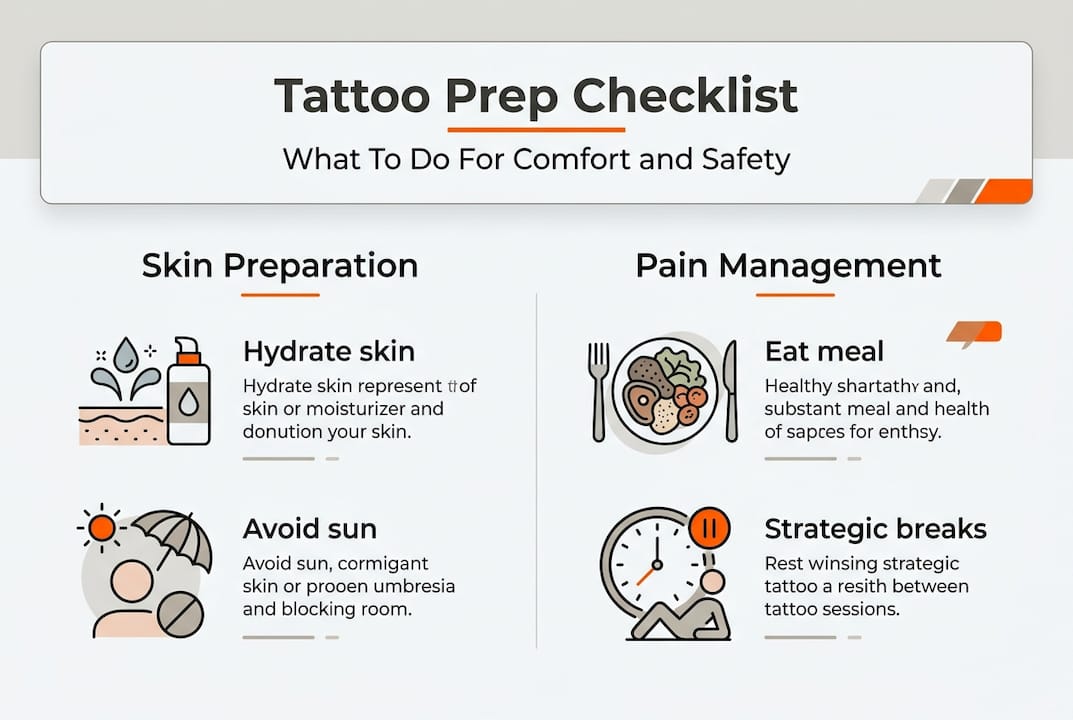
Nutrition and rest directly affect your pain tolerance and endurance. Eat a substantial meal 2-3 hours before your appointment to maintain stable blood sugar. Low blood sugar causes dizziness, nausea, and fainting. Quality sleep the night before helps your body handle stress and discomfort better.
Following skin preparation steps before tattoos systematically improves outcomes. Keep the area clean with gentle soap, moisturize daily with unscented lotion, and avoid harsh exfoliants or chemical treatments for at least a week prior.
Pro Tip: Start your hydration and skincare routine at least seven days before your appointment to give your skin time to reach optimal condition for tattooing.
Managing pain during tattooing: what to expect and practical tips
Pain intensity varies dramatically based on tattoo location and your personal pain threshold. Understanding these factors helps set realistic expectations.
Pain varies by area with ribs, ankles, and wrists hurting more due to thin skin over bone, while areas with more flesh and fat like outer arms and thighs cause less discomfort. Nerve density also plays a role in how intensely you feel the needle.

Bony areas amplify sensation because less tissue cushions the vibration. Ribs, spine, feet, hands, and joints typically rank highest on pain scales. Inner arms, neck, and areas near lymph nodes also tend to hurt more. Fleshy spots like outer thighs, calves, and upper arms generally cause minimal discomfort.
Breathing techniques significantly reduce perceived pain. Practice slow, deep breathing before your session. During tattooing, inhale for four counts, hold for four, exhale for six. This activates your parasympathetic nervous system, naturally lowering pain perception and anxiety.
Taking strategic breaks prevents pain from overwhelming you. Most artists welcome brief pauses every 30-45 minutes. Use breaks to stretch, drink water, eat a snack, or simply reset mentally. Pushing through without breaks often backfires as fatigue amplifies discomfort.
Mental preparation matters as much as physical readiness. Visualization exercises help many clients. Picture yourself calm and relaxed during the session. Avoid catastrophizing or dwelling on worst-case scenarios. Anxiety intensifies pain, while a calm mindset genuinely improves tolerance.
Communication with your artist creates a collaborative experience. Tell them immediately if pain becomes unbearable or you need a break. Professional artists want you comfortable and will adjust pacing accordingly. Suffering in silence helps nobody.
Distraction methods work for many people. Bring headphones and create a playlist that relaxes or energizes you. Some clients chat with their artist or friend. Others prefer meditation or focusing on breathing. Experiment to find what works for your personality.
“Pain is manageable with proper pacing, not just numbing.” — Experienced tattoo artist
Understanding pain management for tattoos through natural methods often proves more effective than relying solely on pharmaceutical interventions.
Pro Tip: Communicate openly with your artist about your pain threshold and preferred break frequency before the session starts to establish a comfortable working rhythm.
Numbing creams and European regulations: what you need to know
Numbing creams present a complex topic in European tattoo culture due to medical regulations and artist preferences. Understanding the legal landscape and practical considerations helps you make informed decisions.
Many European tattoo artists do not recommend numbing creams because they alter skin texture, affect ink retention, and create legal complications for studios. The creams can cause skin to swell or become rubbery, making precise line work difficult and potentially compromising tattoo quality.
European regulations classify numbing creams with lidocaine or prilocaine as medicines, meaning tattoo artists generally cannot supply or routinely apply them. Clients may self-apply pharmacy-grade products like EMLA after performing a patch test 48 hours beforehand. This regulatory framework aims to prevent misuse and allergic reactions.
Pharmacy-grade creams require specific application protocols. Apply a thick layer to clean, dry skin 45-90 minutes before your appointment. Cover the area with plastic wrap to create occlusion, which enhances absorption. Remove all cream residue and wash thoroughly before tattooing begins. Residual cream interferes with ink adhesion.
Patch testing prevents dangerous allergic reactions. Apply a small amount of cream to your inner forearm 48 hours before your appointment. Cover with a bandage and monitor for redness, swelling, itching, or rash. Any reaction means you cannot safely use that product. Skip this step and you risk a medical emergency during your session.
| Cream type | Active ingredients | Effectiveness | Safety profile | European legal status |
|---|---|---|---|---|
| Pharmacy-grade | Lidocaine 2.5%, prilocaine 2.5% | Moderate surface numbing | Regulated, tested | Legal with prescription or pharmacy sale |
| High-percentage online | Lidocaine 5-10%+ | Claims deeper numbing | Unregulated, untested | Often illegal or restricted |
| Non-medicated | Natural ingredients | Minimal to none | Generally safe | Unrestricted but ineffective |
Timing matters critically for numbing effectiveness. Apply too early and the effect wears off mid-session. Apply too late and numbness never fully develops. Most pharmacy creams peak at 60-90 minutes after application. Coordinate timing carefully with your appointment schedule.
Artist consent remains non-negotiable. Some artists refuse to work on numbed skin due to texture changes or personal policy. Discuss your intention to use numbing cream during your consultation, not on appointment day. Surprising your artist with numbed skin creates conflict and may result in rescheduling.
High-percentage creams sold online often violate European medical device regulations. Products claiming 5%, 10%, or higher lidocaine concentrations may be illegal to import or sell in your country. They also carry higher risks of toxicity, especially when applied to large areas. Stick with pharmacy-grade options for safety and legal compliance.
Understanding numbing creams for tattoo pain management helps you weigh benefits against potential complications. Consider why numbing may fail during tattoos before committing to this approach.
Pro Tip: Always discuss numbing cream plans with your tattoo artist during the consultation phase to avoid last-minute complications or appointment cancellations.
Practical checklist and final tips for pain-conscious tattoo preparation
Synthesizing all preparation elements into a clear action plan ensures nothing gets overlooked. Follow this comprehensive checklist for optimal results.
-
Start hydration and skincare routine seven days before your appointment. Drink at least eight glasses of water daily and moisturize the tattoo area twice daily with unscented lotion.
-
Avoid sun exposure to the tattoo area for at least two weeks prior. Use SPF 50+ sunscreen if sun exposure is unavoidable. Reschedule if you develop sunburn or significant tan.
-
Skip alcohol for 24-48 hours before your session. Avoid blood-thinning medications like aspirin or ibuprofen unless medically necessary. Consult your doctor if you take prescription blood thinners.
-
Eat a substantial, balanced meal 2-3 hours before your appointment. Include protein, complex carbohydrates, and healthy fats. Bring snacks like granola bars or fruit for longer sessions.
-
Get 7-9 hours of quality sleep the night before. Fatigue significantly reduces pain tolerance and increases likelihood of feeling faint or nauseous.
-
Choose your tattoo placement strategically if pain is a major concern. Outer arms, thighs, and calves hurt less than ribs, feet, or spine. Discuss placement options with your artist.
-
Practice breathing exercises before your appointment. Master the 4-4-6 technique: inhale for four counts, hold for four, exhale for six. Use this rhythm during tattooing.
-
If using numbing cream, perform a patch test 48 hours before your appointment. Apply a small amount to your inner forearm and monitor for any reaction.
-
Confirm with your artist that numbing cream use is acceptable. Some artists have strict policies against working on numbed skin. Get explicit permission during consultation.
-
On appointment day, apply pharmacy-grade numbing cream 60-90 minutes before your session if using. Cover with plastic wrap, then remove all residue before tattooing begins.
-
Wear comfortable, loose clothing that provides easy access to the tattoo area. Bring a jacket as studios often run cool. Dress in layers for temperature control.
-
Arrive 10-15 minutes early to settle in calmly. Rushing increases anxiety and elevates pain perception. Use those minutes for final breathing exercises.
Prioritizing non-numbing preparation typically delivers better results and healing outcomes. If pain remains a significant concern, discuss pharmacy-grade EMLA with your artist and avoid high-percentage online creams due to European regulations and safety issues.
For European first-timers, healthy lifestyle preparation outweighs numbing interventions. If you choose pharmaceutical support, medical-grade products with artist consent prevent complications and ensure quality results.
Review essential skin preparation steps and learn how to extend numbing effects for tattoo sessions if you decide pharmaceutical support fits your situation.
Pro Tip: Plan your schedule so you arrive rested, hydrated, and calm on tattoo day to maximize natural pain tolerance and support optimal healing.
Explore trusted numbing creams for a more comfortable tattoo experience
If you’ve decided pharmaceutical pain relief fits your tattoo plans, choosing quality products matters enormously. TKTX and Dermacain numbing creams offer European clients reliable options designed specifically for tattoo comfort.
Our TKTX 40% numbing cream bundle provides three hours of guaranteed pain relief, backed by our complete satisfaction promise. If you’re not satisfied, simply return the product for a full refund. We offer free shipping on orders over 30 euros across all European markets.

For clients seeking maximum numbing power, TKTX 55% GOLD numbing cream delivers premium performance for extended sessions. Dermacain 30g premium tattoo care combines effective numbing with skin-supporting ingredients for comprehensive comfort.
Remember to discuss any numbing product with your tattoo artist before purchasing to ensure compatibility with their process and preferences.
FAQ
How should I prepare my skin before getting a tattoo?
Hydrate your skin by drinking plenty of water and applying unscented moisturizer daily for at least one week before your appointment. Avoid sun exposure, alcohol, and blood-thinning medications for 24-48 hours prior. Keep the area clean and well-rested to ensure your skin is in optimal condition for accepting ink smoothly.
Are numbing creams safe and legal to use in Europe for tattoos?
Pharmacy-grade numbing creams containing lidocaine or prilocaine are legal in Europe when sold as medicines, but tattoo artists generally cannot apply them due to regulations. You may self-apply products like EMLA after performing a patch test 48 hours beforehand. Always get explicit consent from your artist before using any numbing product, as some refuse to work on numbed skin.
Which tattoo areas are the most painful and how can I manage the pain?
Areas with thin skin over bone hurt most, including ribs, ankles, wrists, spine, and feet. Fleshy areas like outer arms, thighs, and calves cause significantly less discomfort. Manage pain through controlled breathing techniques, taking regular breaks every 30-45 minutes, staying hydrated, and maintaining open communication with your artist about your comfort level throughout the session.
What should I eat before getting a tattoo?
Eat a substantial meal containing protein, complex carbohydrates, and healthy fats about 2-3 hours before your appointment to maintain stable blood sugar levels. Good options include chicken with rice and vegetables, a hearty sandwich with whole grain bread, or pasta with lean protein. Bring snacks like granola bars, fruit, or nuts for longer sessions to prevent dizziness or nausea.
Can I use high-percentage numbing creams bought online?
High-percentage numbing creams claiming 5-10% lidocaine or higher often violate European medical regulations and carry serious safety risks. These products may be illegal to import or sell in your country and increase the risk of toxic reactions, especially on large areas. Stick with pharmacy-grade options that comply with European medical standards for your safety and legal protection.


