
Over 60 percent of tattoo enthusiasts in Central Europe admit that pain is their number one barrier to getting a new tattoo. For artists and clients alike, finding methods that match the comfort of an American tattoo studio is a high priority. As numbing creams gain popularity, preparing the skin the right way is key for maximum relief and smooth results. Get practical steps to elevate comfort and ensure your next session delivers on both artistry and pain control.
Table of Contents
- Step 1: Prepare The Skin For Numbing Cream Application
- Step 2: Apply TKTX Or Dermacain Numbing Cream Safely
- Step 3: Monitor Numbing Duration And Skin Reaction
- Step 4: Remove Cream And Verify Numbness Before Tattooing
- Step 5: Assess Tattoo Area For Optimal Pain Relief
Quick Summary
| Important Insight | Explanation |
|---|---|
| 1. Proper Skin Preparation is Essential | Wash and dry the tattoo area to enhance the effectiveness of numbing cream application. |
| 2. Apply Cream with Precision | Use a thick, even layer of cream, covering the tattoo area and a half-inch perimeter, for optimal numbing. |
| 3. Monitor Skin Response | Observe for redness or irritation after applying cream to prevent allergic reactions and ensure effectiveness. |
| 4. Test Numbness Before Tattooing | Verify that numbness is significant but not complete, allowing for communication during the tattoo process. |
| 5. Consider Tattoo Area Sensitivity | Different body areas may require adjusted cream application techniques due to varying pain levels. |
Step 1: Prepare the skin for numbing cream application
Getting your skin ready for a tattoo numbing cream involves more than just slapping on the product. You need a strategic approach to ensure maximum effectiveness and comfort during your tattoo session. Think of this as creating the perfect canvas for pain-free ink application.
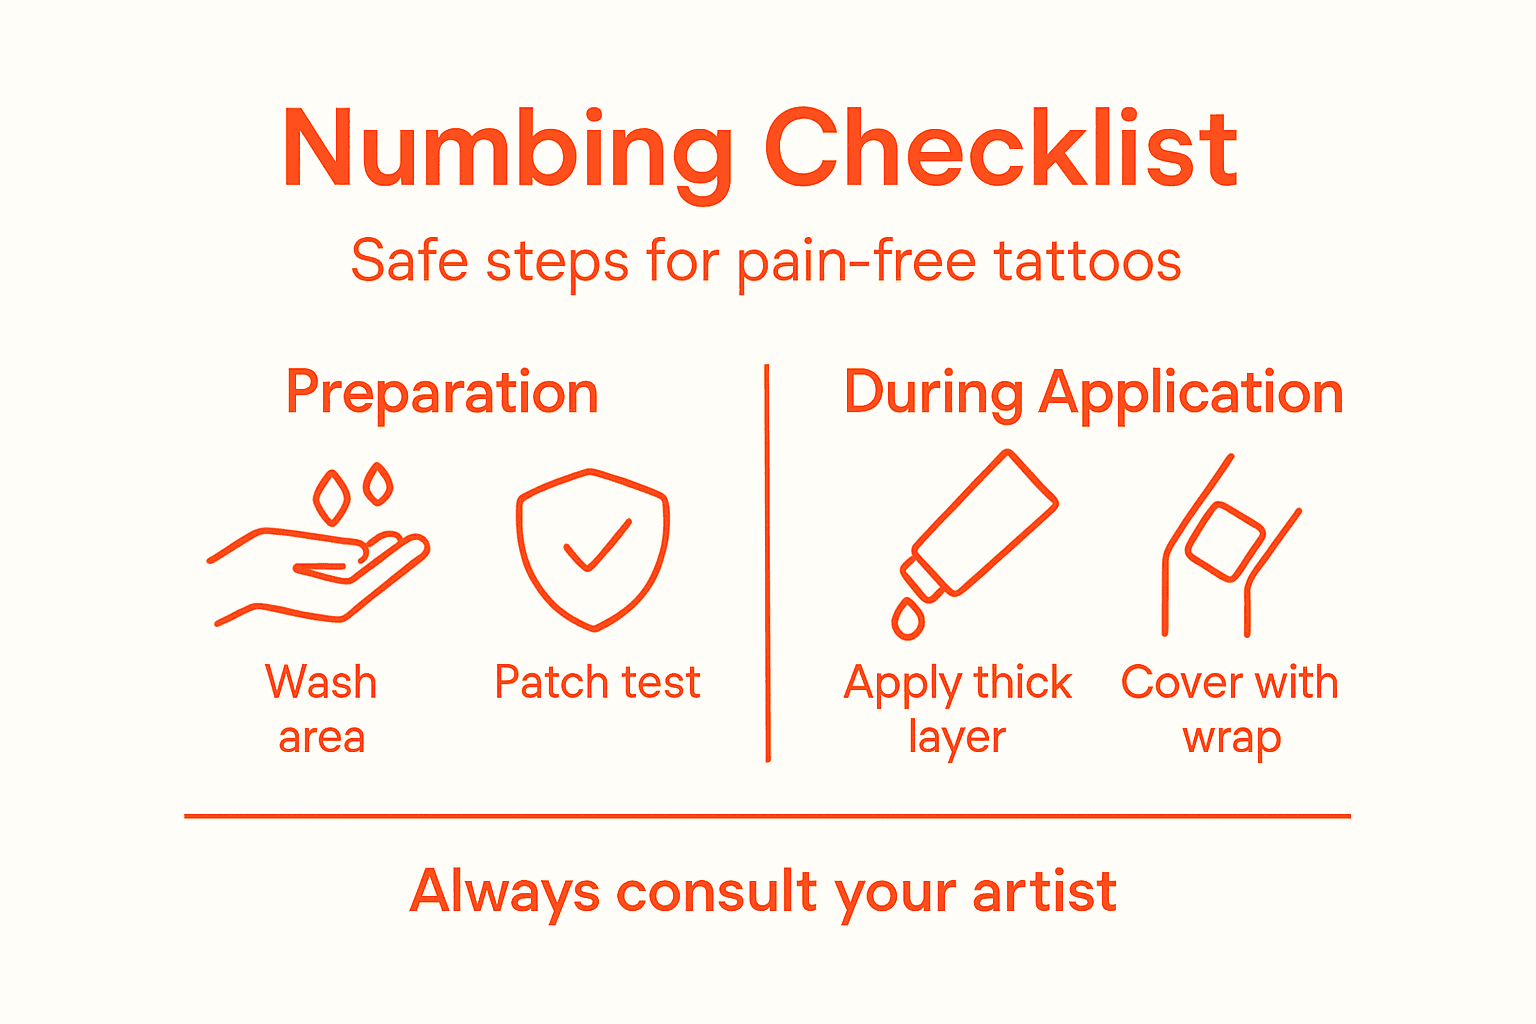
Start by thoroughly washing the targeted skin area with mild antibacterial soap. Your goal is removing dirt, oils, and potential contaminants that could interfere with the numbing cream’s absorption. Use lukewarm water and gently clean the skin without scrubbing aggressively. After washing, completely dry the area using a clean towel or paper towel. Moisture can reduce the cream’s effectiveness, so pat the skin dry rather than rubbing.
Before applying the numbing cream, perform a critical skin check. Ensure the area has no cuts, scratches, active rashes, or open wounds. Applying numbing cream on broken skin can lead to irritation or potential infection. If you have any skin sensitivity or concerns, consult your tattoo artist or a healthcare professional beforehand. Skin preparation guidelines recommend checking the skin’s condition carefully.
Pro tip: Always do a small patch test 24 hours before your tattoo to check for potential allergic reactions and ensure your skin tolerates the numbing cream well.
Step 2: Apply TKTX or Dermacain numbing cream safely
Your strategy for applying numbing cream can make or break your tattoo pain management experience. Think of this as your precision mission to create a comfortable tattooing environment that minimizes discomfort and maximizes your body’s readiness for ink.
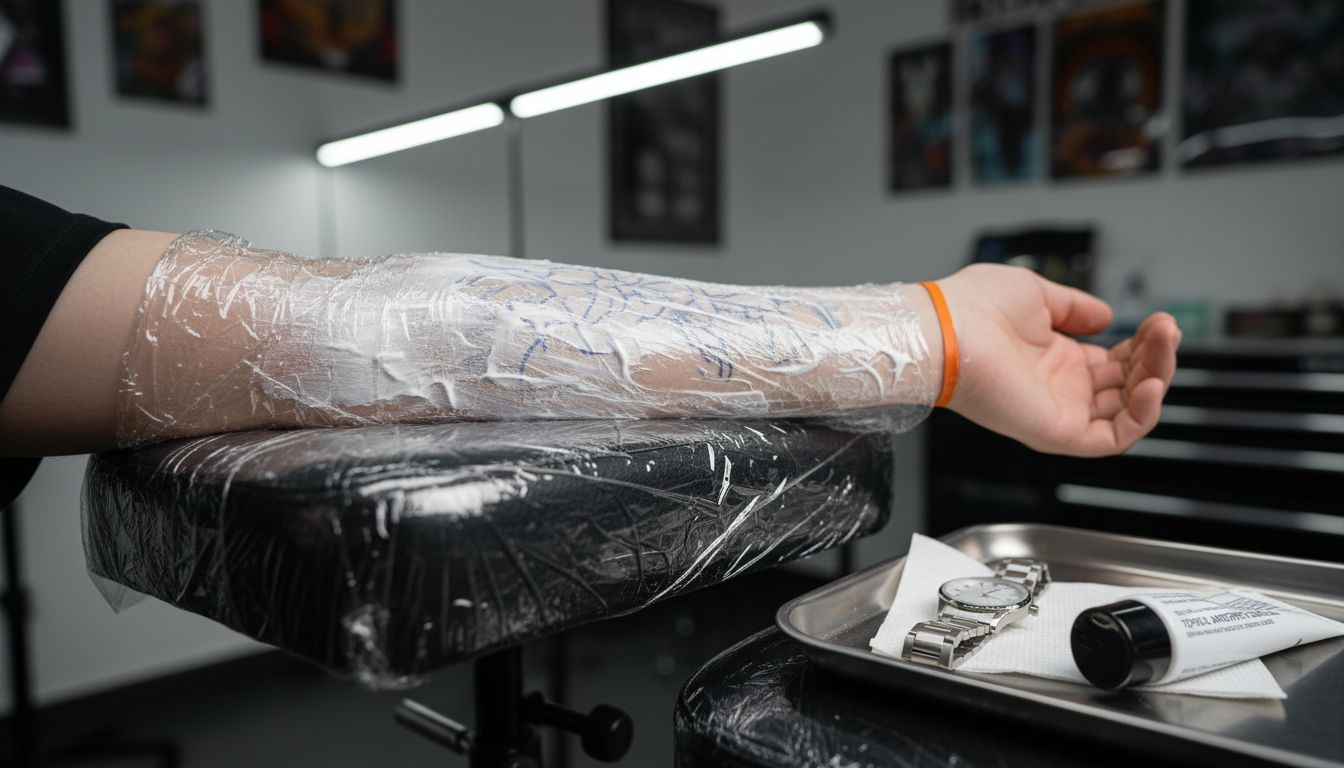
Start by squeezing a generous thick layer of TKTX or Dermacain cream directly onto the prepared skin area. Unlike regular lotions where you rub in the product, these numbing creams require a different approach. Apply the cream in a smooth even layer approximately 2 to 3 millimeters thick so it remains visibly white on your skin surface. Cover the entire area where the tattoo will be placed plus an extra half inch around the perimeter to ensure complete protection.
Once applied, cover the cream with clear medical grade plastic wrap or a transparent adhesive dressing. This covering helps the numbing agents penetrate deeper into your skin and prevents the cream from drying out. Leave the covering in place for approximately 45 to 60 minutes before your tattoo session. During this time the cream will effectively block nerve signals and create a substantial pain reduction zone for your upcoming tattoo experience.
Pro tip: Set a timer for your cream application and remove the plastic wrap just before your tattoo begins to maintain maximum numbing effectiveness and prevent potential skin irritation.
Step 3: Monitor numbing duration and skin reaction
Tracking how your skin responds to numbing cream is crucial for a safe and comfortable tattoo experience. Your vigilance during this stage can prevent potential complications and ensure optimal pain management.
Begin by carefully observing your skin immediately after applying the cream. Detailed medical guidelines recommend checking for any signs of redness, swelling, itching, or unusual discoloration. These could indicate an allergic reaction or skin sensitivity. Pay close attention to the numbness level. While the cream should significantly reduce pain, it won’t completely eliminate all sensations. Expect a gradual reduction in feeling that allows you to still maintain some tactile awareness.
Time your numbing cream application precisely. Most products are effective for approximately 45 to 60 minutes, so use a timer to track the duration. If you notice the numbing effect wearing off before your tattoo session begins, you might need to reapply a thin layer. Be cautious not to exceed recommended application amounts, as excessive usage can increase skin sensitivity. Always remove the cream completely if you experience any persistent skin irritation or unexpected reactions.
Pro tip: Keep a clean, damp cloth nearby during your tattoo session to quickly wipe away any cream residue and monitor your skin’s ongoing reaction.
This table summarizes signs to monitor and actions to take after applying numbing cream:
| Reaction Sign | What It May Indicate | Recommended Response |
|---|---|---|
| Redness | Possible irritation | Remove cream, consult artist |
| Swelling | Likely sensitivity | Stop use, monitor closely |
| Itching | Mild allergy reaction | Wipe off, reassess approach |
| Numb yet tingling | Normal effect | Safe to continue |
| Burning sensation | Adverse reaction | Discontinue immediately |
Step 4: Remove cream and verify numbness before tattooing
The final preparation stage is critical for ensuring your tattoo numbing experience goes smoothly. Your goal is to create the perfect pain management setup that maximizes comfort while keeping your skin ready for precise ink application.
Carefully wipe away the numbing cream using clean disposable wipes or a soft damp cloth. Gently remove all cream residue without scrubbing or irritating the skin. Once cleaned, perform a quick numbness test by lightly touching the area with your fingertip. You should feel a significant reduction in sensation but not complete loss of feeling. Some mild tactile awareness is actually beneficial so you can communicate with your tattoo artist if needed.
Consult with your tattoo artist to confirm the numbness level before beginning the tattoo. Show them the treated area and discuss your pain tolerance. Some artists might want to do a small test spot to verify the cream’s effectiveness. Be prepared that the numbing effect might vary slightly depending on individual skin sensitivity and the specific body area being tattooed.
Pro tip: Keep a small portion of your original numbing cream nearby during the tattoo session in case you need a quick touch up for extended tattoo appointments.
Step 5: Assess tattoo area for optimal pain relief
Preparing your skin for a tattoo requires strategic planning and careful evaluation of the specific area you will be getting inked. Understanding how different body regions respond to numbing cream can significantly improve your pain management approach.
Tattoo site characteristics dramatically impact pain management strategies. Areas with thinner skin or proximity to bones typically require more intensive numbing techniques. Consider these critical factors when assessing your tattoo location. Regions like ribs, ankles, and inner arms tend to be more sensitive and might need longer cream application times or slightly higher cream concentrations. Your personal pain tolerance also plays a crucial role in determining the right numbing approach.
Carefully examine the tattoo site before application. Shave the area if necessary to ensure better cream adherence and effectiveness. Detailed site preparation improves numbing cream absorption and overall pain relief. Look for any skin irregularities, scars, or sensitive patches that might affect the cream’s performance. Discuss your specific area with your tattoo artist to get professional insights about potential pain levels and recommended numbing strategies.
Pro tip: Take photographs of the tattoo area before application to help track any skin reactions and provide a clear reference point for your tattoo artist.
Here’s a quick comparison of numbing cream effectiveness based on tattoo placement:
| Tattoo Area | Relative Pain Level | Numbing Cream Effectiveness | Recommended Approach |
|---|---|---|---|
| Upper Arm | Low | High | Standard application method |
| Ribs/Side | High | Moderate | Thicker cream, longer time |
| Ankle/Foot | High | Moderate | Extra cream, precise timing |
| Inner Arm/Thigh | Moderate | High | Standard, may reapply if long |
| Back/Shoulder | Low | High | Typical application routine |
| Hands/Fingers | High | Lower | Consult artist, use caution |
Experience Truly Pain-Free Tattoos with Trusted Numbing Creams
The article highlights the critical steps to safely prepare your skin and apply numbing creams like TKTX or Dermacain for a comfortable tattoo session. If you want to avoid common challenges such as ineffective absorption, skin irritation, or short numbing duration, it is essential to use high-quality products designed specifically for tattoo pain relief. These creams offer guaranteed pain reduction for up to 3 hours, allowing you to focus on your new ink rather than discomfort. Remember to follow the checklist for application thickness, timing, and skin monitoring to maximize results.

Take control of your tattoo experience now by choosing from our premium selection of TKTX and Dermacain creams available across Europe. We provide customer satisfaction guarantees with money-back offers and free shipping on orders over 30 Euro. Start your pain-free tattoo journey today at https://buytktx.online and get comprehensive guidance for safe use from our expert resources. Discover how safe numbing application can transform your next tattoo into a comfortable and memorable process.
Frequently Asked Questions
How do I prepare my skin for applying numbing cream before a tattoo?
To prepare your skin for numbing cream, wash the area with mild antibacterial soap and lukewarm water. Make sure to dry it completely before application to maximize the cream’s effectiveness.
What is the correct way to apply TKTX or Dermacain numbing cream?
Apply a thick layer of TKTX or Dermacain cream, about 2 to 3 millimeters thick, to the prepared skin area. Cover it with clear medical-grade plastic wrap to enhance absorption for 45 to 60 minutes before your tattoo session.
How can I tell if the numbing cream is working effectively?
After applying the cream, perform a light touch test on the area to check for reduced sensation. If you still feel some awareness, it generally indicates the cream is working; however, monitor for any signs of redness or irritation.
What should I do if I notice skin irritation after applying the cream?
If you experience redness, swelling, or itching after applying the numbing cream, immediately remove it and consult with your tattoo artist. It’s crucial to address skin reactions to ensure safety and comfort during your session.
How long does the numbing effect last from the cream?
Typically, the numbing effect lasts about 45 to 60 minutes. Use a timer to ensure you remove the cream just before your tattoo session begins for optimal results.
Is it necessary to do a patch test before applying numbing cream for a tattoo?
Yes, performing a patch test 24 hours before your tattoo is essential to check for potential allergic reactions. Apply a small amount of the cream to a discreet area of skin and monitor it for any adverse reactions.


