
Most European tattoo artists agree that a well-planned numbing routine can be the difference between discomfort and satisfaction. With nearly 80 percent of American clients preferring numbing solutions for complex tattoos, Central European enthusiasts are increasingly seeking safe, effective pain relief methods. Discover how simple steps and proven tools can help both artists and clients enjoy the tattoo experience with confidence and comfort from start to finish.
Table of Contents
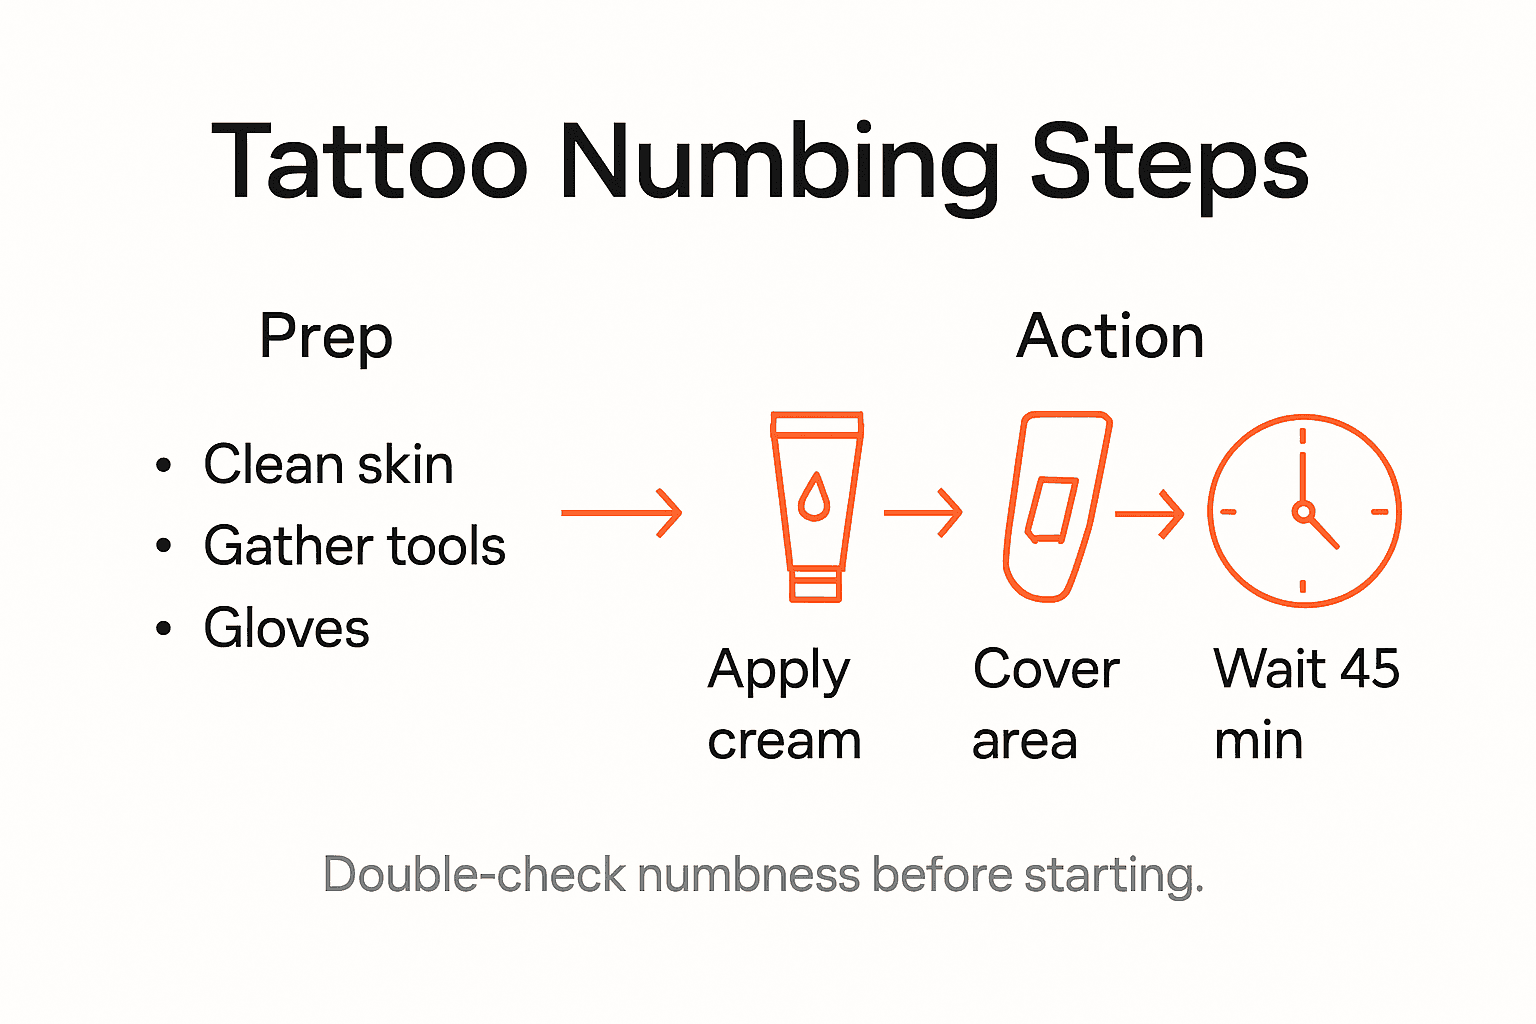
- Step 1: Gather Numbing Supplies And Essential Tools
- Step 2: Clean And Dry The Tattoo Area Carefully
- Step 3: Apply Numbing Cream Evenly On The Skin
- Step 4: Cover And Wait For Optimal Numbing Effect
- Step 5: Check Numbness Before Starting Your Tattoo
Quick Summary
| Key Point | Explanation |
|---|---|
| 1. Use high-quality numbing cream | Ensure you select a topical anesthetic such as EMLA cream with lidocaine for effective pain relief during tattooing. |
| 2. Prepare the skin meticulously | Clean the tattoo area with mild antibacterial soap and warm water to prevent infections and ensure optimal cream application. |
| 3. Apply numbing cream properly | Spread a thick layer of numbing cream evenly over the skin without rubbing it in, then cover with plastic wrap to enhance absorption. |
| 4. Wait for the recommended time | Allow the numbing cream to act for 40 to 60 minutes, keeping the area covered and still to maximize pain relief. |
| 5. Verify numbness before tattooing | Test the numbness with touch and pinprick methods to ensure effective pain management, discussing reapplication with your artist if needed. |
Step 1: Gather numbing supplies and essential tools
Preparing for your tattoo numbing process requires strategic planning and gathering the right equipment. You want a smooth, comfortable experience that minimizes potential complications and ensures optimal pain management during your tattoo session.
First, focus on obtaining high-quality topical anesthetic products. Research shows specific topical anesthetic agents like EMLA cream are essential for effective skin numbing. Look for creams containing lidocaine as the primary active ingredient, which provides targeted pain relief. You will also need complementary supplies such as clean disposable gloves, alcohol wipes for skin preparation, plastic wrap for occluding the numbing cream, and cotton swabs for precise application.
Your toolkit should include medical-grade numbing cream, sterile application tools, and protective barriers. According to research guidelines from daily medical resources, always test a small skin area first to check for potential allergic reactions and ensure the numbing cream is appropriate for your skin type. Verify the cream’s expiration date and storage conditions to maintain its effectiveness.
Pro tip: Keep a detailed inventory of your numbing supplies and replace them regularly to guarantee maximum potency and safety during your tattoo preparation process.
Here’s a quick summary of essential numbing supplies and their purpose:
| Item | Primary Function | Importance |
|---|---|---|
| Numbing Cream | Blocks pain signals in skin | Ensures comfort during tattoo |
| Disposable Gloves | Prevents contamination | Maintains hygiene and safety |
| Alcohol Wipes | Cleans and disinfects skin | Reduces infection risk |
| Plastic Wrap | Occludes cream for absorption | Increases numbing effectiveness |
| Cotton Swabs | Precise cream application | Targets small tattoo areas |
Step 2: Clean and dry the tattoo area carefully
Preparing your skin for numbing and tattooing requires meticulous cleaning to prevent potential complications and ensure optimal results. Proper skin preparation is your first line of defense against infection and helps create the best canvas for your upcoming tattoo.
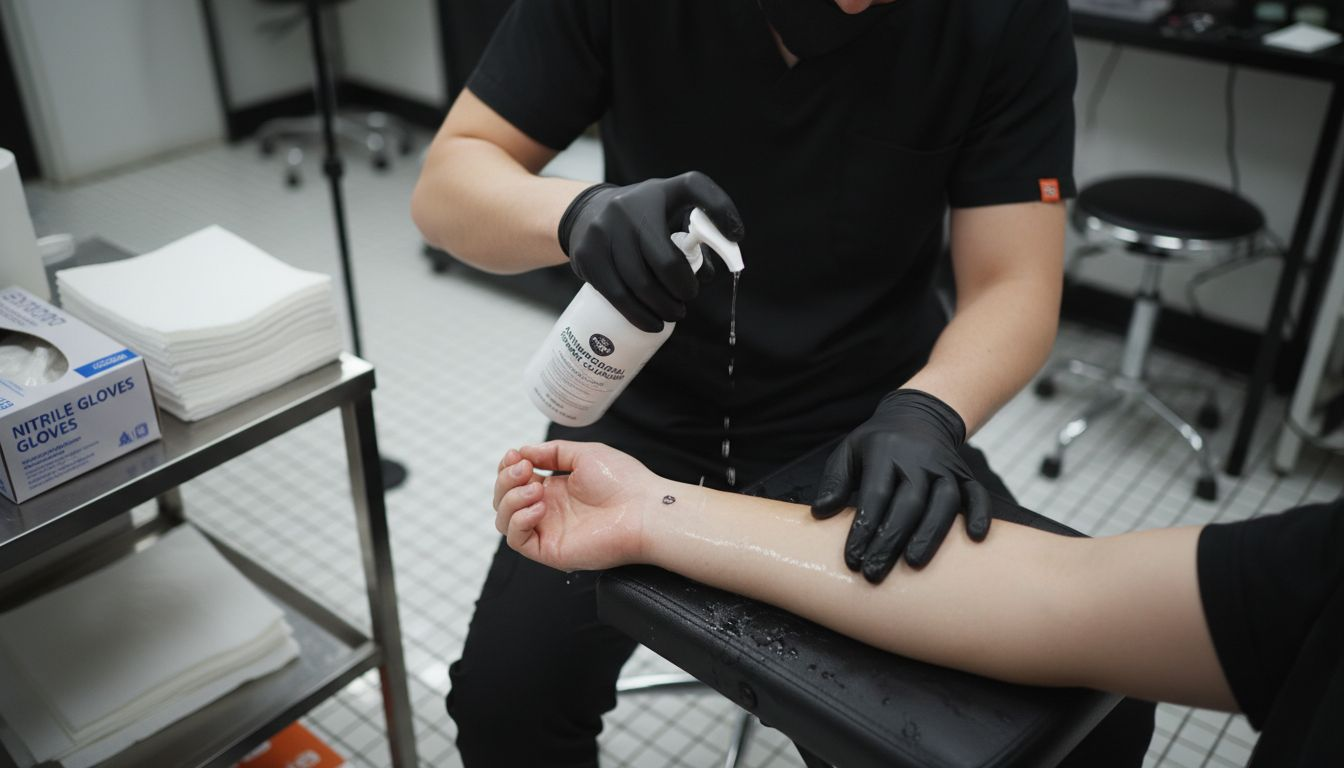
Start by thoroughly washing the designated tattoo area with gentle cleanser and warm water, following strict hygiene protocols. According to medical guidelines, use mild antibacterial soap and focus on removing any dirt, oils, or residue that might interfere with numbing cream application. Use lukewarm water and clean hands to prevent introducing additional bacteria to the skin surface.
After washing, carefully pat the area dry with a clean disposable towel or paper towel. Avoid rubbing the skin, which can cause irritation or small abrasions that might compromise the numbing process. Ensure the skin is completely dry before applying any numbing products, as moisture can dilute the cream and reduce its effectiveness.
Pro tip: Wear clean disposable gloves during the cleaning process to maintain a sterile environment and prevent potential cross contamination.
Step 3: Apply numbing cream evenly on the skin
Applying numbing cream requires precision and care to ensure maximum pain relief during your tattoo session. Your goal is to create a uniform layer of protection that minimizes discomfort and prepares your skin for the tattooing process.
According to medical guidelines for topical anesthetics, apply a thick layer of numbing cream generously across the entire tattoo area. Start by squeezing a substantial amount of cream onto a clean gloved hand or applicator. Spread the cream evenly and thoroughly, ensuring complete coverage of the skin surface. Research on topical anesthetic application suggests avoiding rubbing the cream completely into the skin. Instead, allow it to sit slightly on top to maximize absorption through skin oils.
Once applied, cover the area with plastic wrap to enhance the cream’s penetration and effectiveness. The plastic wrap helps maintain moisture and creates an occlusive environment that allows the numbing agents to work more effectively. Allow the cream to sit for the recommended time typically between 30 to 45 minutes before your tattoo session begins.
Pro tip: Set a timer to ensure you leave the numbing cream on for the precise recommended duration to achieve optimal pain reduction.
Step 4: Cover and wait for optimal numbing effect
The next crucial phase of your tattoo numbing process involves strategically waiting to maximize the cream’s pain-blocking potential. Proper coverage and timing can make the difference between moderate and exceptional pain management during your tattoo session.
Medical guidelines for topical anesthetics recommend covering the numbed area tightly with plastic wrap immediately after cream application. The recommended wait time ranges between 40 to 60 minutes, allowing the anesthetic to penetrate deeply into the skin layers. Research on anesthetic application indicates that the numbing effect continues to intensify during this waiting period, so patience is key to achieving maximum pain reduction.
While waiting, keep the covered area at room temperature and avoid excessive movement or friction. Do not remove the plastic wrap prematurely, as this can interrupt the absorption process. Some individuals might experience a mild tingling sensation this is normal and indicates the numbing agents are actively working. Near the end of your waiting period, gently remove the plastic wrap and wipe away any excess cream with a clean tissue.
Pro tip: Set multiple alarms or use a dedicated timer to ensure you maintain the precise recommended waiting duration without constantly checking the clock.
Step 5: Check numbness before starting your tattoo
Before beginning your tattoo, you must confirm that the numbing cream has effectively blocked pain sensations. This critical verification step ensures you will have a more comfortable and manageable tattoo experience.
Medical guidelines for topical anesthetics recommend testing the treated area approximately 15 to 25 minutes after removing the plastic wrap. Dermatological practices for local anesthesia suggest using two primary methods to confirm numbness. First, gently touch the skin and assess your sensation response. Second, perform a light pinprick test using a clean, sterile needle or pin to determine if you feel any sharp sensations. If the area feels significantly dulled or you cannot feel distinct pain signals, the numbing process has been successful.
Compare two common methods for verifying skin numbness before tattooing:
| Test Method | How It’s Done | Reliability | When To Use |
|---|---|---|---|
| Touch Response | Lightly tap with finger | Moderate | Quick pre-tattoo check |
| Pinprick Test | Use sterile needle on skin | High | Critical before starting ink |
Should you detect any areas with reduced or inconsistent numbness, consider reapplying the numbing cream or discussing alternative pain management strategies with your tattoo artist. Remember that individual skin responses can vary, so being proactive about assessing your numbness level is key to a comfortable tattoo experience.
Pro tip: Ask your tattoo artist to perform a professional sensation test to confirm complete numbness before starting the tattoo.
Achieve True Pain-Free Tattoo Sessions with Expert-Recommended Numbing Creams
The challenge of managing pain during tattooing can be overwhelming. As detailed in the article, applying a high-quality numbing cream such as TKTX or Dermacain ensures targeted pain relief and a comfortable tattoo experience lasting up to three hours. Don’t let the fear of discomfort hold you back from expressing yourself through body art. You can follow the precise steps like applying the cream evenly and covering with plastic wrap, but the right product makes all the difference.

Experience guaranteed satisfaction with our trusted tattoo numbing creams shipped across all of Europe. Benefit from free shipping on orders over 30 Euro and our money back guarantee if you are not completely satisfied. Visit our main site today to get the expert-level pain relief you deserve before your next tattoo. Learn more about how to prepare pain-free by exploring our detailed instructions and product offerings. Take control of your tattoo pain now and enjoy a smooth, relaxed session.
Frequently Asked Questions
How do I apply numbing cream before getting a tattoo?
To apply numbing cream effectively, first clean the tattoo area with a mild antibacterial soap and warm water. Then, generously spread a thick layer of the cream over the entire area, cover it with plastic wrap, and wait for 30 to 45 minutes to ensure optimal pain relief.
How can I ensure the numbing cream is effective?
You can check the effectiveness of the numbing cream by testing the area 15 to 25 minutes after removing the plastic wrap. Use a light touch or a sterile pinprick test to assess if you feel significant sensation loss or dulled pain.
What should I do if the numbing cream doesn’t work?
If the numbing cream doesn’t seem effective, reapply it and allow it to sit longer, or consult with your tattoo artist about alternative pain management options. Take proactive measures to ensure you have a comfortable experience during your tattoo session.
How should I prepare my skin for numbing cream?
Begin by thoroughly washing the intended tattoo area with a gentle cleanser and warm water. Pat the skin dry with a clean towel before applying the numbing cream, ensuring no moisture remains that could dilute the cream’s effectiveness.
How long do I need to wait for the numbing cream to take effect?
Wait 40 to 60 minutes after applying the numbing cream for it to take full effect before starting the tattooing process. This waiting period allows the anesthetic to penetrate deeply into the skin, maximizing pain relief.
Is it safe to use numbing cream on all skin types?
While most individuals can use numbing cream safely, it is important to test a small area of skin first for any allergic reactions. Always verify that the cream is suitable for your skin type before applying it to larger areas.


